Here’s looking at you kid
Here at Smart Chicago Collaborative, we cover a lot of civic innovation events in Chicago with live streaming and live tweeting. We also use a lot of audio and visual equipment to execute our Civic User Testing Group.
This mega-post covers the equipment we use as well as details on how we use it. We seek to propagate the Smart Chicago model for civic innovation work all over the country, so we seek to share as much information about our methods and equipment as we do our source code.
So here’s a deep-dive into our AV/ internet connectivity/ broadcasting stack:
Hardware :
Webcam: We use a Logitech HD Pro C920 Webcam. ($99) The camera has microphone inside and it’s small size makes it easy to carry. The picture and sound quality are both great – although if a room is too noisy the microphone tends to pick up on those sounds more than the speaker. Moving the camera to a position away from attendees generally keeps this issue to a minimum. Christopher Whitaker is the undisputed master of this:

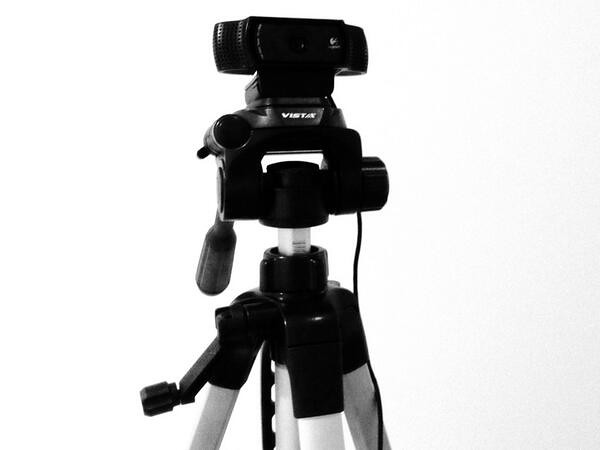
Tripod: It’s best to film speakers at eye level. In order to do this, we use a Vista Explorer 60 inch lightweight tripod ($25). It features a quick-release fitting for the camera and can be set up and broken back down in less than 2 mins. This tripod is also very light with me being able to commute with it on the CTA with little issue. You do have to remember to loosen the top ring to make swiveling the camera easy. If you keep it too tight, the camera can hear the tripod squeaking as you move the camera.
For additional over-the-shoulder surveillance of users in CUTGroup tests, and capturing whole-room experiences in meetings, we have a handheld Canon Vixia HFR 300.
Ethernet Cable: While not required, ethernet cables can make for a better broadcast. Wifi networks can be spotty and if the connection is dropped Google Hangouts will interrupt the broadcast.
Smart Devices: We mostly use our own personal smart phones for live tweeting of events, particularly when we do live stream so that we aren’t clicking away at a keyboard during the stream. We also use the smartphone to check the broadcast (sound, picture, ect). Normally, there’s a short three to four second delay between the real event and the stream. We also often use our personal devices in Civic User Testing Program
During user testing, we also use a number of internet-capable tablets in order to see how civic apps perform on different devices.
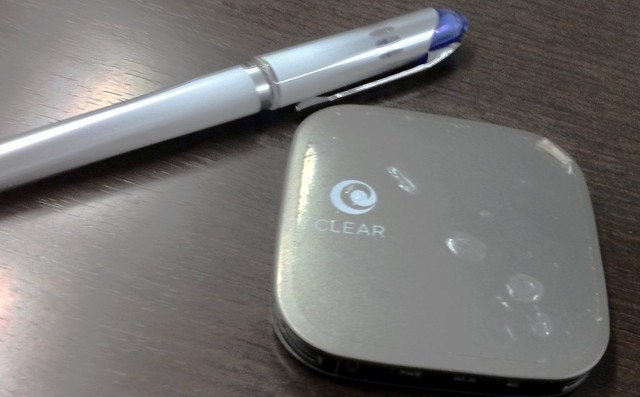
Mobile Citizen Hotspot: When we go to a location without wifi, we use a Mobile Citizen Hotspot device we lease through Mobile Citizen for $120/year. Mobile Citizen is a non-profit organization provides low-cost internet to schools and nonprofits. The hotspot operates on the 4G Clear network. While live streams may not have as high of resolution, the network is fast enough for social media and general internet use. We’ve been able to have up to four devices on a single hotspot during user testing and it’s performed well. The device is very small and fits comfortably in a jeans pocket.
PA System: Periodically we need to do events with speakers in a crowded or large space. At 24 pounds, this is a portable system that gives us enough power to carry a message.
Wireless Mics: Option 1, same brand as the PA system.
Software:
WordPress: WordPress is a blogging platform that we use extensively. Many of the software apps that we list below we choose precisely because they play nice with WordPress. WordPress has a variety of plugins and templates that make content generation a fairly simple process.
Google Hangout: Google Hangouts on Air is a free service that allows you to live stream events and have them automatically uploaded to YouTube. While Hangouts are part of Google Plus, it’s use isn’t limited to just Google Plug.
The easiest way to do a Google Hangout on Air is to start one as your organizations page. After the last revamp, Google moved hangouts to a place that’s harder to find. You can find it by going to Home menu, then clicking Hangouts on Air. The button to start a hangout is at the top left.
When you open a hangout up, it will ask you to name the hangout and invite people. Unlike normal hangouts, you can’t make a live event in which anyone can just walk in. Normally, when we stream live events we don’t invite anyone.
Once we have the window up, we have to tell Google to use the external mic and camera. We then copy the embed link and place it into a blog post on our WordPress site just like we would a YouTube video. While it’s possible to link directly to the video, we like having it in a blog post so we can put links to speaker’s bios, app demos, and some information about what we’re broadcasting.
During the broadcast, we can use the “Screenshare” tool to show what is on our screen. During some of our broadcasts, we’ll also have a projector on our machine. This means that as we’re showing an app demo we’ll have a better picture than if we were filming the projector screen.
If we’re having multiple people on the hangout, we’ll use the cameraman tool to force the screen to only show what we want it to show. This is useful since Google Hangouts tend to automatically jump to the loudest person whether this is talking, a cough, or most commonly typing.
The only drawback to Google Hangouts is that it won’t post videos to the page’s YouTube account, but rather the individual user’s account. Smart Chicago gets around this by embedding the final video to a blog post.
For user testing, we use Google Hangouts to show the developer what is happening with the user test. This allows the developer to see first hand how their app is performing without the developer looking over the user’s shoulder.
Screenflow: Screenflow ($99) is a video capture tool that’s available for both PC and OS X. We use Screenflow to record what is currently on our computer screen. Screenflow lets you record audio and video from both the computer and an external camera/microphone. We use this software extensively during user testing so we can put together videos like this one below:
CUTGroup #2, Tester #2 Father responsible for three children (17, 16, and 10) Samsung Galaxy Kelly Library, Englewood from Daniel X. O’Neil on Vimeo.
We also use Screenflow to edit videos we’ve recorded during a live stream. When we complete a live stream, it will automatically load to YouTube. However, these videos can be up to two hours long. YouTube doesn’t allow users to download their videos and so we have to have someway to re-capture the video. To do this, we use Screenflow to record our computer screen while playing the video on full screen.
Once we have the stream loaded, We crop the video to remove the YouTube bar from the bottom. We then split the video up into multiple parts. Screenflow lets you upload videos directly to YouTube, although this does take some time to complete.
Once we have the different videos in YouTube, We’ll use the embed code from each video as part of a longer blog post. This helps put the videos into context and link to items that they discuss in the video.
Flickr: Flickr is a photo sharing site that makes it simple to manage and host photos. We prefer to use Flickr because it’s sharing tool generates code that we can insert directly into WordPress. Flickr also has a mobile app that makes uploading photos a snap. Additionally, Flickr makes it simple to release your photos under the Creative Commons license.
Vine: We use vine during live events to capture items that are best seen in video, but where we may not have a live stream going. Vine captures about 6 seconds worth of video, so while it’s great during live events – we don’t tend to use it for other things.
Have questions about something we use or how we use it? Feel free to ask us on Twitter @SmartChicago!


 Website")


