 Note: here at Smart Chicago, livestreaming events on our YouTube Channel is a core activity. We do this because we want people around the county to be able to see all the civic innovation going on in Chicago and because we feel that this knowledge is useful past the actual event itself. We have hundreds of hours of videos about civic innovation in our archives. Christopher Whitaker is the King of the Stream over here, so I asked him to document how he does it. Here’s his take. —dxo
We’ve broken this down into three parts. First, We’ll talk a little bit about how to do this on the cheap. Next, we’ll go over about how to do things if you have a budget to spend, and finally the equipment that we use to do the livestream.
First, some pre-requisites
Before we get into how to do the livestream, we first need to take care of a first housekeeping items. Mainly, making sure that you have a YouTube page setup for live streaming. If you don’t have a YouTube channel for your organization then you’ll need to create one. Once you do that, you can set yourself and other team members as managers. (If you’re also on Google+, it’ll take you to that page.)
Here’s a short video to show you the process.
Livestreaming: The quick and easy version
YouTube allows you to conduct live streaming from it’s Google Hangout interface without any other special equipment. Do keep in mind is that you’ll want the fastest internet connection possible. The faster the speed, the higher quality the video will produce. We also strongly recommend using a wired connection using an ethernet cable – particularly at larger events. If there are too many people on the wifi, Google won’t get a good feed and it’ll end your video.
To create an event go to your channel page. You’ll notice that there’s a section called live event with a link called “create live event.” Click that and name your event. You can set the start time, end time, description and tags for the event. Once you’re ready to start your live stream – press “go live” and it will bring up the Google Hangout screen.
Once it’s up, you can press the ‘gear’ to get to the settings. While you can use your computer’s internal webcam – having an external webcam does make a significant difference in quality. (We use a Logitech HD webcam.) If you have an external microphone, you can also select that as well.
At the bottom right corner of the page, you’ll see a chain icon that says ‘links’ when you hover over it. You can use that to share your livestream through Twitter or embed the video stream inside a web post.
Once you’re ready, hit “Go Live” and the hangouts will start to stream. When you’re done, simply click the ‘End’ button to stop the broadcast.
Here’s a video to show you the process.
Livestreaming with Wirecast:
If you have a budget and do live streaming often enough, it may be worth it to invest Wirecast. With Google Hangouts on Air, the computer is having to send everything to YouTube and YouTube is doing the work crunching the video into a format that YouTube can send out to the universe. This means that the quality isn’t the best it can be and the delay can be somewhat long.
With Wirecast, your computer is doing the encoding and sending it upstream. This means you can get a much better picture and have a number of different features you can play around with.
Wirecast for YouTube can be a bit pricey, but the Wirecast for YouTube (found by clicking here) is a less expensive version.
To create a live streaming event that you intend to use for Wirecast, follow the same steps to create an event as before – but this time choose “Custom” encoding. That will give you a new tab called “Ingestion setting” that will let you choose your recording rate. This will largely depending on your computer and your internet speed. The faster your computer, the more bitrate you can produce. If you have a fast internet connection, you can then send higher bitrates to YouTube. Generally, we stream at 480p when on location and 1080p when we’re at the Chicago Community Trust (which has a gigabit connection.)
Once you set it up, you can then go to the “Live Control Room” where it will immediately yell at you for not being able to find your stream. That’s OK. It’s now time to open up Wirecast.
Wirecast can be intimidating for the uninitiated and it’ll take some playing around to get comfortable with it. The first thing you’ll want to do is to click “Layout” and uncheck the preview button. You’ll then go to “Switch” then “Autolive.” That should give you a picture of whatever is going through your camera.
Below the video, you’ll see several bars. One of them will have a small picture of whatever is going through your camera. This is probably your internal webcam. If want to use an external camera, you’ll need to add it. To do so, hover over the ‘plus’ icon next to the small picture and click the camera icon to add your camera. You can also add a desktop presentation as well if you want to show information from your computer.
Once you do that, you can also click the gear icon to change settings – including telling wirecast you want to use an external microphone is you have it.
Wirecast also lets you use chyons – those little text boxes that you always see on the news. To add one, hover over the plus ‘above’ the bar with the camera shots. Click the ‘paper’ icon to add a new shot. (Not a new camera shot – just new shot.)
For now, click the gear icon and click edit shot. Once you’re here, click ‘fullscreen view’ and apply. Under “Attributes” you’re going to see three icons. Click the “T” icon and you’ll see a gallery of different graphics. We use either the “Royal Title” or the “Tab Title” when we want to show somebody’s name. Once we pick one, we then click the “T” icon to the right of Attributes. Once we get there, it’ll give use four different lines of text. I usually use the first one for the social media hashtag or the name of the event. For the second, the persons name and third line for their organization. Once we’re done, we can close the window.
That was a lot of work right? What if we have to do that for a bunch of speakers?
If you click the “gear” icon on the shot we just created, it will give you an option to duplicate the shot.
Once we’re done, go to File and Save. Now, all of the settings that you just created have been saved – so you won’t need to do this again.
To switch between shots, simply click on the shot from the bars. The shots at the higher bars go on top of the lower bar. So, if you select you external camera and the chyron we created – it will produce a feed showing both. If we want the chyron to go away – we simply click ‘blank shot’ and it’ll go away.
The next thing we’re going to go over is social media. If you’ve ever watched The Voice or American Idol, then you’ve seen your tweets show up in the broadcast. You can do that too! Go to “Social” in the menu and click “Settings.” It will have you log into Twitter and ask what do you want to use as your message feed I usually click “Search” and enter in the hashtag for the event we’re covering such as #chihacknight. Once you do that, you should then be able to click “create shot” and “message feed.” Once you do that, you’ll see a new shot show up at the top bar. Clicking this will bring out a chyron that shows the twitter bird. When you clicked on message feed it showed you a window with tweets. Clicking on one of these tweets will cause that tweet to show up in the social media shot. To broadcast it, simply click on the social media shot.
To be fair, this takes some getting used to and it’s recommended you allot at least an afternoon to play around with it.
Once you’re ready to broadcast, we’ll need to go to the gear setting next to the “Record” button near the top of the application. It’s going to ask us to pick an output destination. Pick “YouTube” and hit OK. It’ll then show you a button that says “Authenticate” – click that and log into YouTube.
Once you do that, it should automatically bring up the event that you just created. From there, close that window and hit the “Stream” button. It should light up red. We can then go back to YouTube where it should show us a “Stream Status OK.” If your connection is slow, it’ll give you warning message and you may need to go back and use a lower bitrate. If everything looks good, click on preview. If it still looks good, you can click on “Start Broadcast” to start your event.
If you go to “View on watch page” you can then share the video just like you would on a normal YouTube using the “Share tab”
Here’s the video demonstrating broadcasting with Wirecast.
Our equipment
While you can do a live stream with just your computer – we use a few pieces of equipment to make the quality of our livestream better.
Logitech HD Pro C920 Webcam:
Even a year after our initial purchase, this camera is still one of the best out there for what we need. The camera has microphone inside and it’s small size makes it easy to carry. The picture quality is great. If you’ve watched our live stream and noticed some pixelation – that’s coming from a bad connection through Google Hangout – and not the camera.
The camera comes with a microphone, although if a room is too noisy the microphone tends to pick up on those sounds more than the speaker. Moving the camera to a position away from attendees and closer to the speaker generally keeps this issue to a minimum. However, the sound is one of the bigger issues we have. When we edit the videos, a lot of the time we’ll boost the sound. There have been a few times – for example, when the room gets super crowded or the AC is on – that we’ve been unable to use a video because we can’t get the sound right.
That said, the Logitech HD Pro is still one of the best cameras that are out there. We actually purchased two more of these cameras as part of our upgrades.
Vista Portable Tripod
It’s best to film speakers at eye level. In order to do this, we use a Vista Explorer 60 inch lightweight tripod ($25). It features a quick-release fitting for the camera and can be set up and broken back down in less than 2 mins. This tripod is also very light with me being able to commute with it on the CTA with little issue. You do have to remember to loosen the top ring to make swiveling the camera easy. If you keep it too tight, the camera can hear the tripod squeaking as you move the camera.
The issue with this tripod is that it isn’t tough. We carry this around to a *lot* of places and it’s gotten a little banged up. Pieces have fallen off the tripod (such as the light plastic handle) and the bag has been torn in some places. Of course, at $25 bucks you can consider this tripod an expendable item.
We’ve now gotten three smaller tripods that can fit into a messenger bag. This should cut down on wear and tear since we’re not lugging them on our back.
Ethernet Cable
While not required, ethernet cables can make for a better broadcast. Wifi networks can be spotty and if the connection is dropped Google Hangouts will interrupt the broadcast.
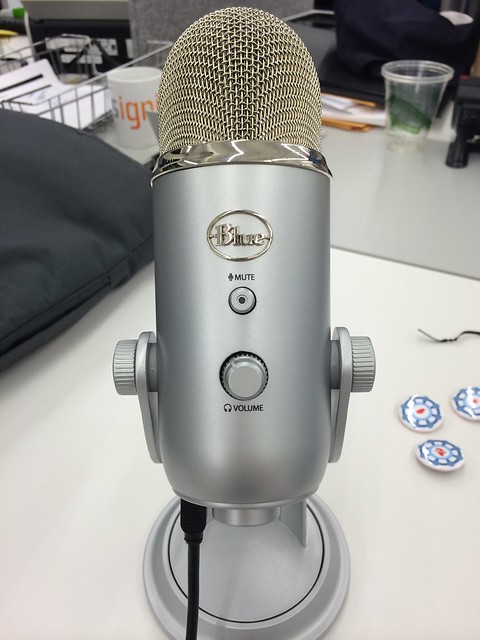
Blue Yeti Microphones
One of the biggest weaknesses of our old setup was the sound. We now have three Blue Yeti Microphones – microphones that made Wirecutter’s Best USB Microphones. These mics have multiple modes: Omnidirectional, single direction, and bi-direction. While these microphones are pretty big, they are still fairly portable. The Blue Yeti microphones pick up much more sound that the webcam does. We also bought USB extenders so that we can have the mic set up right near the speaker. (Blue recommends about 6 inches.)
The one downside to the Blue Yeti is that it’s almost too powerful. We have to be careful not to put it on the same table as somebody who is typing because it will pick up on that. We normally have it on it’s own table/stand and bring it close to the speaker. The closer it is to the speaker, the less gain I need to use – which helps cut down on background noise.


